what would cause values to be deleted when a record is created in salesforce
Overview
Cloudingo allows you to create a unique list of records that you lot want to delete in bulk. To do this, specify which records you want to delete by choosing specific field values (for example, choose all records that do non have an email address, do non take a phone number, and practice non have an address).
Navigation
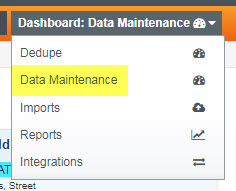
To access the Data Maintenance feature, click the Dashboard menu drib box at the meridian of the folio, and choose "Information Maintenance" from the listing of options.
Once in the Data Maintenance dashboard, to create a new filter to delete records, click on the 'Deportment' menu to the top, correct corner of the page, so choose 'Create New Job'.
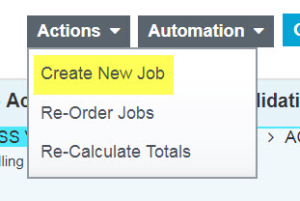
The Automation menu might as well exist utilized from this dashboard if you need to manage automation settings or if you need to temporarily halt all automation processes from running on your Data Maintenance jobs. Please see our help article hither for more than details on the automation card options.
Step 1: Create Job
Tab 1: The Basics
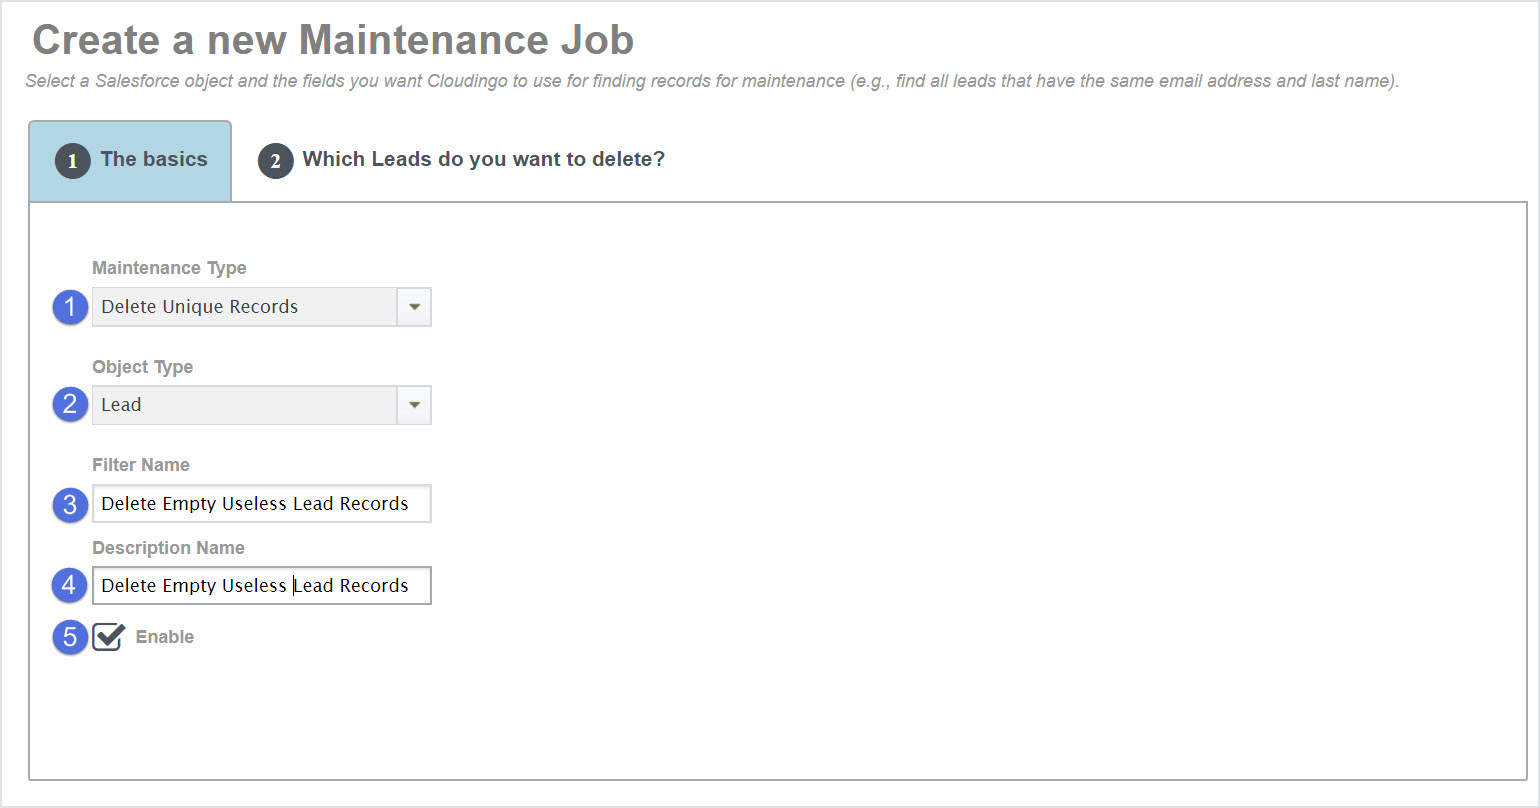
- Choose 'Delete Unique Records' for the Maintenance Type.
- Choose 'Lead', 'Contact', 'Account' (or 'Person Business relationship' if enabled in your org) for the Object Type that yous wish to filter and delete. Note: If you lot accept custom objects enabled in your org, you will likewise be able to choose from your custom objects as well.
- Give the filter a descriptive name so that you know exactly what the filter volition be doing when viewing information technology on your dashboard.
- Add a description if desired.
- Make sure that the filter is 'Enabled' so that it will summate results.
Tab 2: Which Leads/Contacts/Accounts do you lot want to delete?

Select Criteria
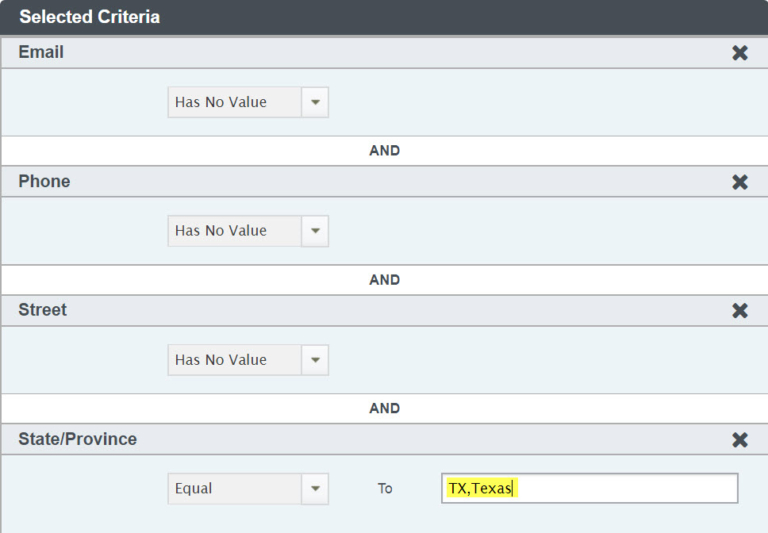
Select any standard or custom Salesforce fields to filter on. Drag and drop the field that yous want to specify a value for into the 'Selected Criteria' department. In the example in a higher place, we are pulling in all Lead records that practice not have a value populated in the email, phone, and street fields.
When using 'Equal' or 'Not Equal', 'Contains', 'Does Non Contain', 'Starts With', or 'Ends With', you lot can specify multiple values (which volition utilise 'or' logic), separated by commas and no spaces. For example, to examine records in the country of Texas merely, drag the State field and prepare it to (Equal) 'TX,Texas' to detect all possible matches. (When using 'Equal' or 'Not Equal', the values must be entered exactly equally they appear in Salesforce in society to be detected.) This applies to all field types except multi-picklists.
Further, multiple fields and values tin be selected. For example, if you want to update records for a particular company but only those in the state of Texas, elevate the Country field over to the selected criteria and fix it to (Equal) 'TX,Texas' to find all possible matches. Both the visitor name and land must match in order to pull the results.
Warning
Utilize caution when setting upwardly filters to use formula, calculated, or related object field values. If the field is a reference field rather than a physical field on the object, changes to the field value will NOT trigger syncs to Cloudingo. Using calculated fields on an ongoing basis may crave re-indexing the object by Cloudingo support.
NOTE: Using an existing written report in Salesforce is recommended in lieu of using 'Select Criteria' when including formula, calculated, or related object field values. (See below)
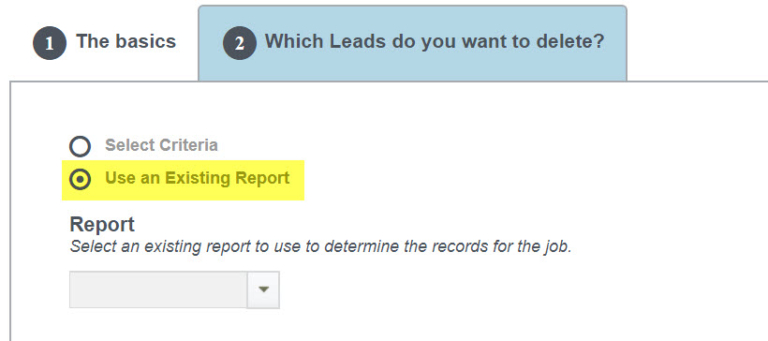
Apply an Existing Report
If you have an existing report already configured in Salesforce that produces a listing of the records that you want to update, you can toggle to the 'Employ an Existing Report' option in Tab 2 instead of the defaulted 'Select Criteria'. This will give y'all the ability to select the existing Salesforce study in the filter configuration to ascertain your records to update.
Your report must incorporate the Salesforce Record ID (using the standard ID field) equally ane of the field values displayed. The report must also be accessible to the user establishing the connection to Cloudingo.
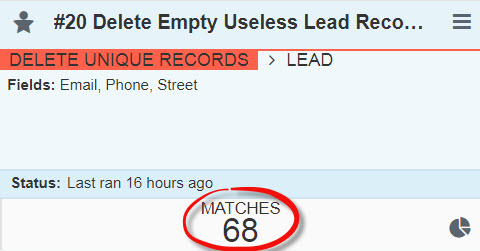
Step two: View Filter Results
One time you lot've created your Delete Unique Records data maintenance chore and the chore has finished calculating, click on the matches link to view the results of the records establish by the chore.
Once in the preview screen, you will encounter the full list of records pulling into your filter results on the left hand side of the folio. Clicking on the row (or blueish arrow) for any of the records on the left side will pull upward the preview on the correct hand side of the page and so that you can view the tape details.
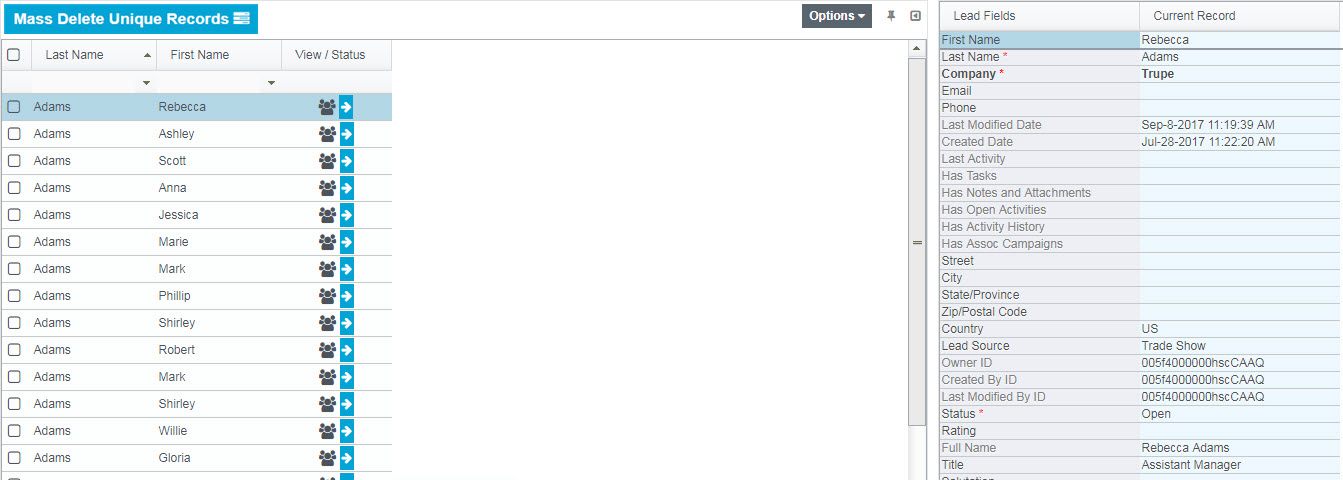
The ![]() icon will display next to any record that may also be a potential duplicate within Salesforce. Consider running all of your dedupe filters prior to your delete job.
icon will display next to any record that may also be a potential duplicate within Salesforce. Consider running all of your dedupe filters prior to your delete job.
Annotation
If you cannot view the updated field and value in the gray column, you may have 'Collapse Empty Rows' enabled under the 'Options' menu at the elevation correct corner of the page. Fields with bare values are subconscious from the preview when this option is called. You can click 'Options' to de-select the 'Collapse Empty Rows' selection if this is the case.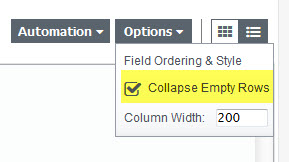
Cheque to ensure that you are seeing the correct results and make any modifications to the task as necessary.
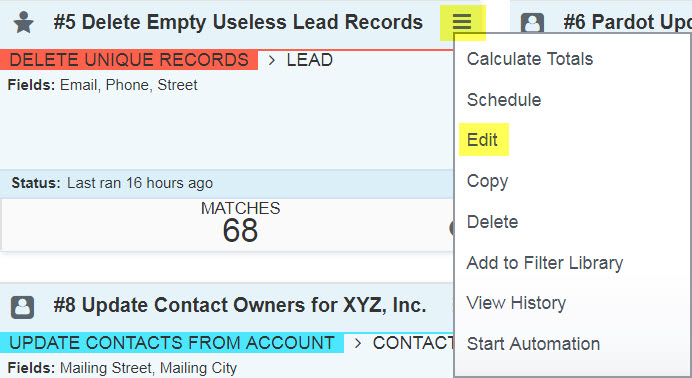
To edit a filter, go back to the Information Maintenance dashboard (by clicking the Back choice at the top of the page or by choosing Information Maintenance from the dashboard options). Once in the Information Maintenance dashboard, click the filter carte selection (the three lines at the top right corner) of the filter that you need to edit, and choose 'Edit' from the card options. This will take y'all back into the filter configuration tabs where y'all can add or edit criteria equally necessary.
If you need to make changes to the job or add boosted criteria, be sure and Save and Recalculate the job after making your changes. Preview the results once more for accuracy.
Once you are comfortable with your job and the results, you are set up to perform your delete jobs.
Step 3: Delete Records
You can perform deletes in several different ways. Yous can delete one record at a fourth dimension, in mass ane folio at a time, or past starting an automation job to process them all automatically.
Manually
(Ane record at a time)
Get to the preview folio from the filter results. Click on the first tape in the listing that you lot would similar to delete to bring it into view, then delete the records one record at a fourth dimension by clicking the Delete option (which deletes the current record in view and remains on the electric current page view), or the Delete & Load Side by side, which will delete the electric current tape in view then load the next record in the listing to preview. The 'Delete' and 'Delete & Load Next' buttons are located at the bottom right corner of the preview page.
Mass Delete
(1 page of results at a time)
Become to the 'View/Edit' preview page from the filter results and select the All button at the pinnacle, so click Mass Delete Unique Records.
Automation Job
(Delete all records inside the filter automatically)
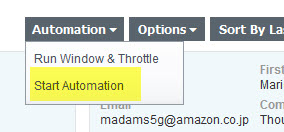
Become to the preview page from the filter results and choose Automation → Starting time Automation from the top right corner of the folio.
You lot can also run or schedule an automation task straight from the Data Maintenance dashboard by going into the filter menu options. The job volition start immediately after walking through a series of confirmation pages to start the chore.

- Choose Schedule to set up an automation task on the filter if you desire to repeat the job regularly (daily, weekly, monthly) or schedule information technology to run at a later date/fourth dimension instead of right now.
- Get-go an automation task on the filter directly from the Data Maintenance dashboard from within the filter menu past choosing Commencement Automation. The chore will showtime immediately after walking through a series of confirmation pages to start the job.
Video
Video: Deleting Records
taylorthapterefor.blogspot.com
Source: https://help.cloudingo.com/docs/delete-unique-records-data-maintenance
0 Response to "what would cause values to be deleted when a record is created in salesforce"
Post a Comment